Tile Removal

tile-removal.JPG

We’re slowly making progress with the tiling.  We’ve got 3/4 or so of the tile up now, however yesterday I realized that two tiles had to come down.  I was a bit over anxious and didn’t realize that the corner shelves we are installing will require not just the closest tile to the corner to be cut, but also the one next to it.   Without a way to cut the tile on the wall, I was forced to remove the tile and put a new one up.  The good news is that the tiles are adhering to the Durock extremely well.  The bad news is that the tiles are adhering to the Durock really well :-/.  I first tried chiseling off the tile, and ended up taking most of the cement board with it.  On the second tile I tried breaking up the tile and trying to remove small pieces at a time.  This left more of the Durock in place, however it also broke it up so that after removing the tile I had to cut out the damaged pieces of Durock.   I plan on patching the hole with a few coats of thinset and fiberglass tape, and hopefully this will create a stable surface for the replacement tile.

Tile Floor

tilefloor.JPG

This weekend I started laying the tile for the floor of the bathroom.  I’d been on hold for a few days waiting for a new blade for my tile saw.  The tile looks great, and I really like the diamond pattern, although it is a bit more difficult to put down in this fashion.  I’ve also found that I’m getting better at laying the tile, and that laying tile on the floor is significantly easier than laying it on walls.  I’ve also found that instead of mixing the thin-set in a big square-ish bin thing (Picture), if I mix it in a small 5lb joint-compound bucket, I can use the drill mixer to quickly and easily mix up a batch.  While this probably wouldn’t be a big enough batch for a more skilled tile setter, for me its perfect.  This small bucket is much easier to move around, and cleanign it up takes only a minute as opposed to the lengthy and messy process of cleaning the other bin.

Felker FTS-50

saw.JPG

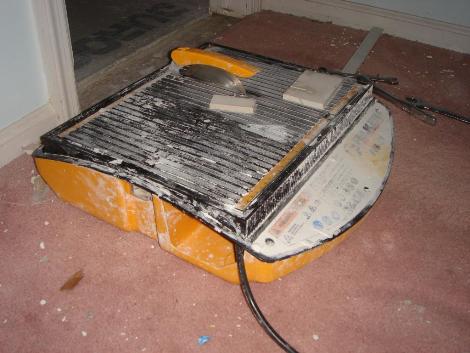
When I started planning our bathroom remodel, I began looking into different methods for cutting tile.  There are a slew of choices, Tile snappers, wet saws, jig saws with carbide blades, or nippers.    I looked at Lowes and saw that they had some decent looking saws, and picked out a mid-range one, the Felker FTS-50.  Since I was only doing a small bathroom I figured this would be just what I needed.   I’d never used a wet saw, so I tried it out and it seemed to cut well and besides for being incredibly loud, I was pretty happy.  The saw came with a crappy plastic fence, a little plastic thing that was meant to help guide the tiles if you cut them at an angle.  I tried to use these at first, but found them to be causing more problems than they solved, and ended up just drawing a line on the tile and cutting them free hand. 

Cutting the tiles in this manner worked well, however after awhile I noticed the cuts where chipping alot.  I assumed that since I was using a porcelain tile, the blade had worn out.   I figured the blade that came with the saw wasn’t of the highest quality, and that I could just buy a replacement blade and all would be well.  However this is where things go south.  I went to Lowes, and found, that while they have 4″, 4.5″ and 7″ Diamond blades, they don’t have a 5″ blade.  I thought about getting a smaller blade, but if the blade wasn’t big enough then it wouldn’t touch the water.  Well I assumed they were just out of stock, so figuring you can buy anything online, I turned to the web.  After a ton of searching I realized that 5″ tile saws are not very common, in fact this Felker may be the only one.   Therefore getting a blade was not easy.  I asked at one store for a porcelain blade and was told that the FTS-50 was not cut out for porcelain tile, and that the motor would surely burn up if I tried.  Well a bit late for that, wish someone had told me that before I bought it.

At this point I sent an e-mail to Felker, asking where I could get a replacement, and was told to check local tile stores.  I replied saying that I had, and they didn’t carry 5″ blades, but never heard anything back.  After alot of searching I finally managed to get a new blade from the nice folks at PremiumBlade.com .  It wasn’t anything fancy, but it was pretty cheap, and I did notice that it had alot more diamonds in it than the original.  I quickly installed this and made a few trial cuts.  To my surprise, the tile still chipped and the cuts weren’t clean.  As I was playing around with it, trying to figure out why, I noticed that the blade seemed to wobble.  It was hard to tell when it was moving, but easy to see as the blade came to a stop.  After re-installing the blade a few times, a came to the conclusion that the shaft was actually bent.  At this point I went back and looked at some of the tiles I cut earlier, and noticed they none of the cuts looked very smooth, and they all had alot of chipping.  So I assume that I just never noticed it before.  So at this point, I’m going to just have to live with the poor quality of the saw.   Its to late at this point to return it, and I certainly don’t want to waste another $100 on a better saw. 

If anyone else is thinking of buying a Wet Saw, I would highly recommend not getting the FTS-50.  Felker Saws have a good reputation, however regardless of how good the saw is, getting one that you can’t get a replacement blade for is just silly.  In fact, I’m amazed that Lowes even sells this saw.

Bathroom Floor

cementfloor.JPG

The bathroom floor is going to be tiled with the same tiles that we are using on the walls in the shower.  The floor of the bathroom was originally done with a thick-mud bed over a wire lath.  Since I’m fairly certain I didn’t have the skill to do that, I’ve done what is much more common these days, and that is to lay down some Durock over some plywood.  This gives a nice flat base without alot of skill required.  To keep everything in place, I first screwed down the plywood to the plank sub-floor (trying to get the screws into the studs as well).  Then I put a coat of thin-set over the plywood, and laid the Durock on top of that.  The picture above is just a test fit, so there is no thin-set in that (but check out the gallery for those pics).  I once again used my jigsaw with an old blade to cut the Durock, which works wonderfully, if a bit messy.  Cutting out the part for the toilet drain was a bit tricky, as I didn’t want to just cut out to big a section for fear it would destabilize it.  After test fitting the pieces and laying the thin-set I then laid the sheets down, and slid them around a bit to get them to bed into the thin-set well.  Then I screwed them down using Rock-On brand cement board screws, which work wonderfully for securing the Durock.  Lastly I used some fiberglass tape, and some more thin-set to secure the seams.

Sheetrock Part 2!

sheetrock.JPG

On Friday I put up some more Sheetrock.  I was originally planning on using bigger pieces, however due to the small size of the bathroom it was impossible to get the large pieces of Sheetrock into the room.  I also forgot that joints should be on the studs, and had to put in a couple of patches to keep the edges from moving.  Still I did manage to get the plumbing for the toilet in, and even got the hole in the right place.  Which is particularly surprising considering just how poor my Sheetrock cutting skills are.  Out of 7 or 8 pieces in the bathroom I didn’t get a single one cut right the first time.  I’ve also learned that with ‘rock’ products, be it Sheetrock or Durock, you should never try to force it in, as it will just end up cracking.  My general problem seems to be that I cut the pieces to close to the actual measurements.  Then when the sides aren’t square, or my cuts are a bit off it doesn’t fit.  I need to learn to cut them 1/2″ or so small and then just spackle over the gap.

Window #2 is in

window1.JPG

I managed to get window #2 in the other day.  I think it looks pretty good, although I need to put some wood trim around it.   Oddly it looks a bit crooked from the outside, however the window is dead level, so I’ll have to investigate if perhaps the shutters are crooked.  The window went in pretty easily once I had the opening all prepped.  Prepping the opening was a bit more difficult mostly due to the crappyness of the 2×4’s that I got from Lowes.  The bottom of the old window sloped out heavily and so the outside was much lower than the inside.  I wanted to frame up the bottom to bring it to the same height as the inside.  Should be as simple matter of taking a 2×4 and nailing it down.  Unfortunately the 2×4 was extremely warped, and even after throwing a  handful of nails into it, and a few screws (breaking my bit in the process) into it, I couldn’t get it to lay flat.  So finally I pulled it out, went back to Lowes and after going through a pile of lumber found a few boards that were reasonably flat.  Once I got those in, it went pretty smoothly.

Insulating!

insulation.JPG

This is another case of why you should always budget more than you expect for a project.  You see we had started out assuming that the insulation in the walls would be fine.  However after tearing down some of the Sheetrock I noticed that the insulation said ‘1.5″ Economy’.  That means that instead of the recommended R11->R28 for a outside wall in our climate, we probably had about R6.  So I checked out the insulation at Lowes and since it would only be 20 bucks or so to replace it, I figured it would be a good idea.  Picked up a couple of rolls of 15″ wide, 3.5″ deep (since we have 2×4 walls)  R13 insulation, and was happy to find that its quite easy to install.  It fills the stud bay completely, and has nice little flaps that make it easy to staple to the studs.  Hopefully the added insulation will keep the bathroom nice and toasty warm in the winter time!

Ohh No, a Giant hole in the House!

hole1.jpg

You might ask why in the middle of a bathroom remodel, I decided to replace the window in the front of the house.  How I got there is a bit of a long story.  You see it turns out, I’m cheap and didn’t want to waste three dollars worth of insulating foam.    Perhaps I should go to the beginning.  When we decided to redo the bathroom we wanted to replace the old window there.  Since it seemed silly to just order one window I decided to replace the front three windows as well.   Of course I planned on not actually installing the windows until I had finished the bathroom, but then halfway through installing the bathroom window I realized that insulating the window would only require half a can of Great Stuff foam.   Since you can’t really save the foam once you start using the can, I figured it would be a better idea to do another window and use the other half on that.   Seemed like a good idea at the time, but now I’m thinking it might have been a better idea to just concentrate on the bathroom and live with spending an extra couple bucks on the foam.

More Tiling!

tiling2.JPG

After going to Lowes and spending another 250 bucks, we put up another walls worth of tile last night.  At Lowes we picked out the shower floor tile, and the grout we are going to use.  Also picked up some insulation for the outside walls,  some blinds to go with our new windows, and a couple bits of plumbing stuff.  I’m hoping this will be our last big trip to Lowes for awhile, which is good because we used the very last of the 10% off coupons we had.

Since this was the second wall of tiling, we’re starting to get the hang of it, and it went up fairly easily.  We did have a problem trying to get the tiles to lineup with the other wall though.  Since this wall wasn’t straight, and since we didn’t want to cut the tiles here, it caused some of the gaps in the tile to be a bit bigger than we would have liked.  Hopefully it won’t be very noticeable once we’re all finished.  We had to stop about 6ft up the wall, as we’d like to put a row of trim tile there, and we don’t yet have that tile.

Tiling!

tile.JPG

Last night we put some more tile up, this time around the area where the vanity will go.   It’s a bit of a waste, as most of this area will be covered by the vanity, but this way if we ever decide to change to a pedestal sink or a smaller vanity it will all match.  It also let us get some practice in on an area where a mistake won’t be noticed.  The tiling went pretty easily, although it was fairly slow.  Due to the small area, and the pipes and such, a large number of tiles needed to be cut and that really slowed things down.  We got into a good rhythm though, with Jess measuring the tiles and me cutting them.  The tile saw I’ve got was a cheap little Felker, with a 4″ blade.  It works pretty well, although I think its going to need a new blade soon.  Tonight we’ll hopefully get a good chunk of the shower done.  We can’t do the top two feet or so, as we don’t have the trim tiles yet, but we’ll try and do the rest of it.