Shower Curb

showercurb.JPG

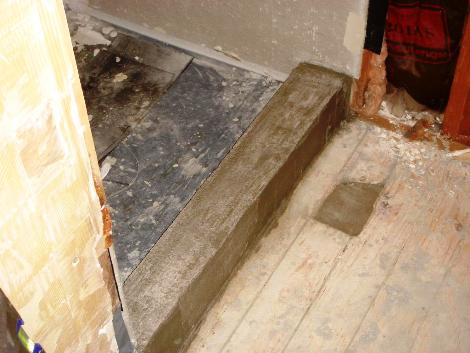
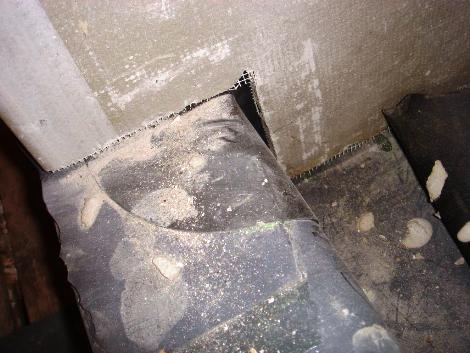
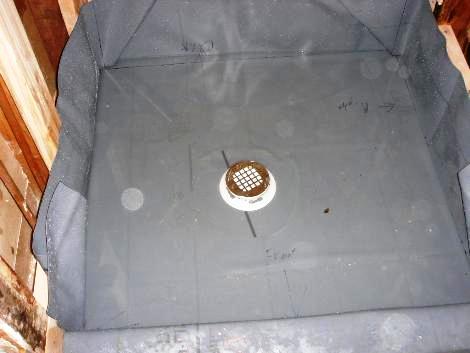
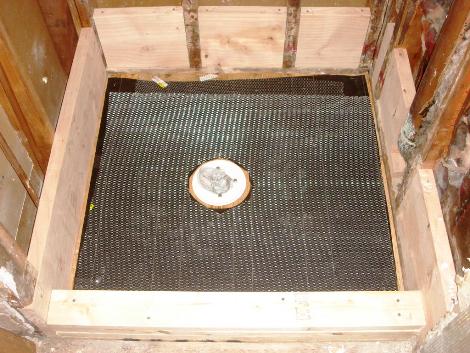
The shower curb is constructed of three 2×4’s which is then covered with the shower liner, and then covered with a metal lathe.  On top of that I’ve put about 3/4″ of mortar.  Forming the curb was actually easier than I expected.  Using a pair of wood strips  on the top to keep it level and make a nice sharp corner, I was able to get a reasonably decent looking curb.  I found that I had added a bit to much water to the mortar, which meant that the sides of the curb kept slouching down.  However after waiting a bit for the mortar to firm up and dry out, I was able to get it to stay in position and got a nice flat top, with nice sharp corners.  I’ve also put a bit of a slope on the top so that any water that gets on it, flows into the shower, instead of out of it.  I did notice after the curb had dried that the right side was a bit thicker than the left, but its barely noticeable and shouldn’t cause any problems.

Shower Dam Corner

damcorner.JPG

Not really the best picture, but this is the corner on the top of the shower curb.   Since the shower membrane starts out as a flat sheet, it needs to be cut to go over the curb.  This means that the inside corner is unprotected on the top.  I ordered a pair of these PVC liner inside corners from the Noble company to stick over these areas.  They were a bit tricky to install, getting fully into the corner, but they should protect this corner from water leaking in.

Taping the seams

durockseams.JPG

Today I taped the seems in the Durock, using the special cement board fiberglass tape.  I say special because its apparntly not the same stuff that is used for installing sheetrock, which of course meant that I had to go buy a whole new roll of the stuff.  The cement board stuff is Alkali resistant to protect it from the cement based thinset.  The general process was acutaly pretty easy, although I did end getting more thinset on the floor, than on the joints when trying to do the upper corner, but I was smart enough to put some tar paper down before hand.   Therefore the only downside was the thinset getting on my feet.  This picture looks a little odd, because the thinset is half dried, so part of it is light gray, and part is dark gray.

Time to Rock!

durock.JPG

With the liner in place, it was time to do the Durock on the walls.  On the far wall I had added some shims made of 1/4″ plywood to bump out the studs so that Durock could lay flat over the drain pipe that I found stuck out beyond the studs.  After that I started cutting the Durock and hanging it up.  To cut the Durock I had originally bought a carbide scoring cutter, but after doing the piece for the ceiling I found that a jigsaw with an old blade on it, allowed me to cut circles easily, and I started using it for the straight lines as well.  While it dulled the heck out of the blade, even the dull blade cut through the board very easily, and made a nice clean, straight cut.  Unfortuanly after putting up two pieces I realized that I had forgotten the vapor barrier underneath, and therefore had to take them down, put up the tar paper, and then put the boards back up.  My wife gave me a hand putting up the Durock, as I couldn’t hold them, and screw them in place all by myself.

Testing the Shower Pan

liner.JPG

The most important part of the whole shower is the pan liner.  This is the part of the shower that is acutlay waterproof, and the last line of defense against the water.  Its crucial that the pan be isntalled correctly, without any holes in it.  The pan gets installed on top of a ‘deck mud’ pre-slope.  This means that the liner, when correctly installed will have a slight slope to it so that all of the water that collects in the pan, flows down into the weep holes in the drain.  Since the pan is so cruical, its important to test it by filling it with water leaving it overnight and making sure it doesn’t leak. 

Thats what I’m doing here, I’ve installed the liner over the pre-slope, folded and sealed the corners, and added extra reinforcement around the drain.  I’ve then stapled the upper edge of the ban to the 2×10 blocking I installed, and have filled it with water.   I’ve also drawn a line at the height of the water, so that I can tell if any has leaked out.  Hopefully tommorw morning the water will be at the same level, and teh ceiling below will be dry!

Getting ready for the Pre-Slope

floor2.JPG

The floor of a ceramic tile shower is an impressively complex system, with a slew of layers in it.  After putting in the plywood floor, the next step is a tar-paper backer, and then a metal lathe to add strength to the mortar that makes up the pre-slope.  I’ve also stacked three 2×4’s at the entrance to make up the shower dam, which will prevent water from flowing into the rest of the bathroom. 

Plumbing in the Shower Valve

showervalve.JPG

After putting in some lights to see by it was time to do the shower valve.  We’ve ordered some nice Moen Evahardware to use, and while we have to wait a few weeks for the handle and trim to show up, they had the valve in-stock so we could put that in.  Moen has some very fancy ‘Posi-temp’ setups, that allow you to always have the same temperature shower every day.  Of course these setups cost abotu $500, vs ~$150 for the regular single handle setup.  We figured that for that price we’d just get the regular valve, which also means that the installation is easier! 

 So after cutting out the old two handle shower valve, I cut up some pipe and soldered in the new valve.  At first I was getting the connections way to hot, and was having trouble getting the solder to wick into the joints, but after realizing my mistake, it went pretty quickly.  As you can see I did get some slight burns on the sheetrock, but nothing significant.   The valve can also be used with a tub setup, which means that in addition to the hot/cold pipes, and shower head, I also needed to put a stub and a cap on the bottom output.  Since I’m continually frustrated by the short showers I encounter,  I was very happy to be able to run the line almost to the ceiling so that I finally wouldn’t have to duck to get my head wet!

Time for a bit of electrical

electircal11.JPG

After putting in the light, the next step was to wire it.   So I broke out my wire cutters, and ran some wire from the existing outlet up to the light fixture.  I then removed the existing box, since it was only big enough for one switch, and put in a 3-wide box.  This will allow us to have the switches for both the vanity lights, and the shower lights, as well as the GFCI outlet all right by the door.  The switches for the fan, and heatlamp will go on the far wall.  These aren’t actually the switches that will be used, I’ve ordered some light-up switches to use instead, to act as a bit of a night-light for those middle of the night bathroom trips.  I also realized that I should rearrange the box, so that the outlet is closest to the stud,  as it is under the most load from plugging and unplugging.

Ceiling

ceiling1.JPG

After putting the floor down I realized I needed some more light to work with, so I put up the Durrock and recessed lighting fixture that will go in the ceiling of the shower.  The fixture is an airtight can, since the other side of the ceiling is the attic, this will prevent any air leaks, and the cover for it is a gasketed, shower specific cover, that will prevent the bulb from getting wet.   The installation actually went pretty easily, once I had the Durock cut to size, I hoisted it up, and with the help of my wife screwed it to the joists.  Then I climbed into the attic and was able to slip the hangers for the light underneath the joists, and adjust them so that the can was centered over the hole.  This was alot easier than putting the light up first, and then trying to get the hole in the Durock to match up.

New Shower Floor

floor1.JPG

With the drain all installed, I layed down a piece of 3/4″ plywood for the new shower floor.  I also added some 2×10 blocking to attach the new shower pan to.  This was the point were I discovered a significant problem.  The copper vent pipe (on the right hand side of the picture) stuck out about 1/4″ beyond the studs.  Since I couldn’t move the vent pipe, this meant that I would have to add some sort of wood strips to the walls to allow the Durorock to lay flat.  This was also the point that I realized I needed a framing hammer, as the little hammer I generally use was not up to the task of nailing in the 2×10’s.  However since I was feeling rather broke at this point, I decided instead to use some galvanized screws instead.