Shower Drain, Part 2

drain2.JPG

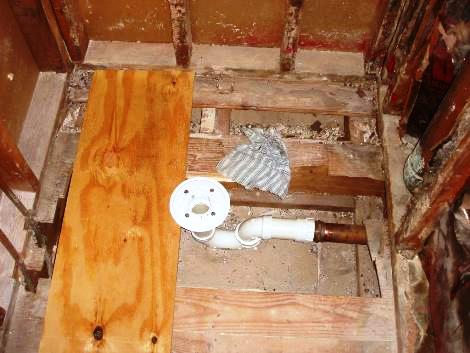
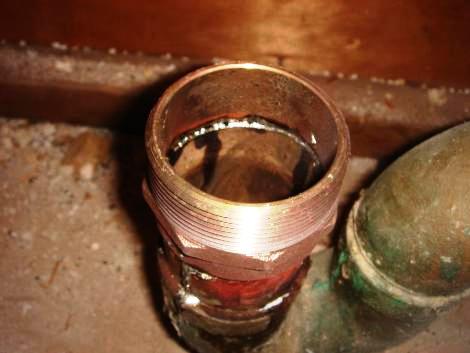
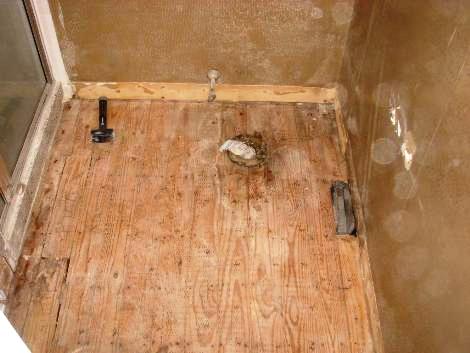
While my soldering skills of the drain adapter were spot on, apparently my measuring skills were not.  After fitting the drain, a small piece of PVC, and the threaded adapter to the top of the pipe, the shower drain was way to high.  So I had to unsolder the brass adapter, cut off the copper trap, and replace it with a PVC one.   The upside of this is that I get a nice fresh clean trap to work with, the downside is that there are now many more potential spots for leaks.

New Shower Drain

drain1.JPG

Once I finished the demolition I started with the rebuilding.  The first step was to get the shower ready for tile.  This meant patching in a 3-piece PVC drain onto an exisiting copper drain pipe.  To do this, I cut off the old drain, and soldered on a threaded adapter to attach to the PVC.  This was my first shot at soldering pipe, and I’m pretty happy with how it turned out.

Shower Floor

demo7.JPG

 This is the last step of the demolish, removing the floor of the shower.   This was obviously not the original floor, but its hard to tell just what was new and what was original.  The floor itself is made of a solid 2  inches of concrete, which I think was precast.  It was quite sturdy, but after a bunch of whacks with the sledge it cracked into pieces.  Unfortunately this was the easy part.  The floor had a few pieces of re-bar through out it, as well as some metal on the edges.  I’m not sure if the metal on the edge was meant as a shower pan, or was leftover from the original installation.  Whatever it was for, it had mostly rusted away.  What hadn’t rusted away however was intact enough to make removal quite difficult as it held the large chunks of concrete together.  At this point I had already generate a few hundred pounds of debris, and was not looking forward to getting the garbage men to pick up a hundred pounds of concrete.

Shower destruction

demo6.JPG

With the rest of the bathroom done it was time to tackle the shower.  The tiles in the shower were layed on bare sheetrock, a big no-no in a wet area.   On the upside this made tearing it out much easier.  The sheetrock was quite damp, and using a crowbar, the tiles easily fell away from it.  I was a bit scared to see what I would find behind the walls of the shower as I had dreams of giant piles of mold and fungus growing back there.   I was happily suprised to see that it wasn’t bad at all.   There were a few spots with some mildew on them, but other than thtat it was fine.

Floors done!

demo5.JPG

I removed the toilet, as well as the heating vent, and finished removing all of the floor tile.  Removing the toilet was quite easy, although some water did get on the floor.  I also managed to crack the base of the tile trying to get the corroded bolts out.  Fortunately I was not planning on reusing the toilet, but I would suggest that if you are you should be very careful, as it cracked quite easily.  I was very happy to find that the mortar came off the floor cleanly, as I was not looking forward to having to replace the sub-floor.  You may notice that there are some gaps in the floor on the left side of the picture.   I had originally thought the they just did a crappy job laying the floor, but it turns out that these were conveniently labeled “Pipes” and were easily removed to check the piping beneath.

Floor Demo

demo4.JPG

 After removing the vanity, and wall tiles I got back to work on the floor.  At first I was using my chisel (in the upper left) but after awhile I realized that the easiest way was to just hit the tiles dead on with the hammer, after a few hits they would break up and come off the mortar.   Actually ended up being much easier than I thought.

Vanity removal

demo2.JPG

Before I could demo the rest of the floor I needed to remove the old vanity.  I was hoping to get it off in one piece, however this proved to difficult and I ended up breaking it apart to get rid of it.   After carefully undoing all of the plumbing connections on the sink, I lifted the sink up.  To my surprise, the drain did not come apart at the spot where I had undone it, but had instead just ripped in two at the trap.  After taking a moment to be impressed with my own strength, I realized that the walls on the drain pipe were incredibly thin, and I was once again happy that we had decided to get rid of it, as it seemed like just a matter of time before it failed.  Another interesting note is that this appears to not have been the original sink, as it looks like there are holes in the tile to support a pedestal sink.

It Begins!

demo1.JPG

The demolish has begun!  We’ve finally taken the plung, and past the point of no return.  I started demolishing the old bathroom today, starting with the floor of the bathroom.  The floor is made of small tiles set in a bed of thick mud, over a metal lath.  Using my regular hammer it was very slow going, and alot of work.  The obvious solution? Buy a bigger hammer!  I swung over to Lowes on the first of many (many, many, many) trips and picked up a small (3lbs?) sledge hammer.  Since this was on the second floor and I didn’t really feel like destorying my house, I refrained from getting a full size sledge.  This new hammer made the work much, much easier and soon I had a nice size hole going.

The real problem

showerfloor.JPG

This is the real cause of the bathroom remodel.  While the rest of the bathroom is ugly and dated, it is still perfectly functional.  The shower however is leaking.  It appears that the shower pan has failed, and that combined with the cracking grout is causing the problems.  The preivous homeowner had tried to seal the cracks with caulk, however this was only a temporary fix.