Weep Protector

weepprotector.JPG

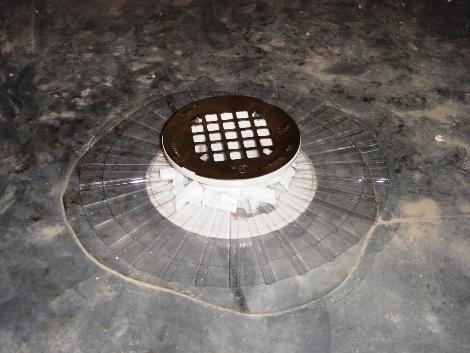
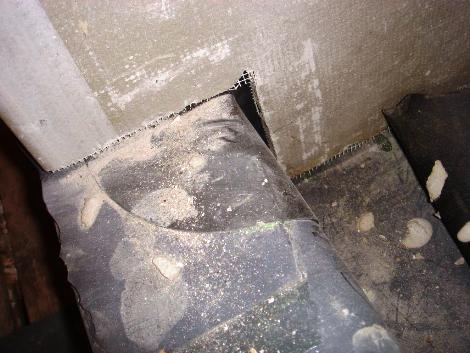
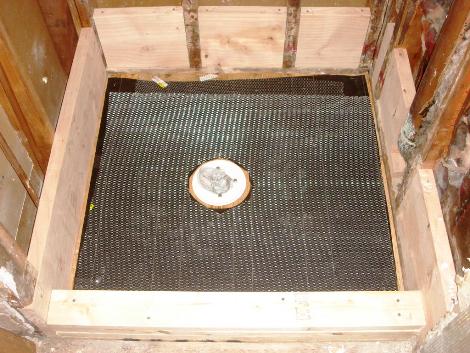
The shower drain is a surprisingly complex device consisting of three separate pieces.  the first piece goes under the shower liner, and actually attaches to the drain.  The next is a ring that clamps the liner down on top of first pieces so that no water can get underneath the liner.  This second piece also has a few ‘weep’ holes in it, which are very important, and allow any water that gets to the liner, to actually drain away, and not just be trapped by the third piece.  The third piece is what you actually see, and is threaded into the second and is adjustable in height to match the depth of your base and tile.

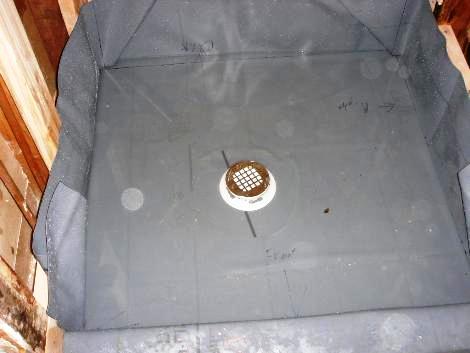
The weep holes need to be protected from the mortar, else they would clog and become worthless.  Typically this is done with some pea gravel, or some broken tile or tile spacers.  However when I was ordering my liner cornersI noticed that Noble has a Positive Weep Protector.  Since I didn’t have any pea gravel, or spare tile spacers, and the sharp edges of broken tile scared me, I decided that since it was only a couple of bucks I’d try this out.  Its just a piece of clear plastic, that has ridges in it which would allow any water to flow underneath the mortar and get to the weep holes.  Seems like a good idea, but since I couldn’t find anyone who knew anything about it, I figured just to be on the safe side I’d toss a few tile spacers on top of it, as some added protection.

Deck Mud

deckmud1.JPG

Today I put down the second layer of deck mud (the first layer, the pre-slope,  goes under the liner) onto the shower floor.  This layer is constructed of a type of mortar that is called “dry-pack” mortar, or deck mud.  There seems to be alot of different opinions on just what this should consist of,  compounded by the fact that nobody seems to sell a pre-mixed deck mud product.  It also seems that there are alot of different things that will work, and they really just vary in how easy they are to get down.  If you use a mix that is too wet, you’ll have a hard time getting it to hold its shape.  If you use a mix that’s too strong, once it dries it will be impossible to knock out any lumps.  If you use a mix with to big an aggregate, you’ll end up with a lumpy floor, and if you use a mix with too much cement, it will shrink when it dries, and could crack. 

Therefore, the best mix is a ratio of 5 parts sand to 1 part cement, mixed to a fairly dry consistency similar to wet sand at the beach.  This won’t be a extremely strong product, but as its just going in the floor of your shower, it doesn’t need to be.  With the high amount of sand in it, it won’t shrink much as it dries, so you don’t have to worry about it cracking, and with just a dry mix its not too difficult to get the proper slope.  For more information, from a tiling expert, check out John Bridge’s page on Deck Mud.

First Tiles!

ceiling.JPG

We finally got to putting in some tile!  This is the first tile I’ve ever done, and doing the ceiling first was probaly not the best idea.  However it seemed to make the most sense, and so thats what we started with.  I’m quite happy with how it turned out, the grout lines look nice and even, and all the tiles are in line.  The only problem is that some of the tiles stick out a bit mroe than others do.  However since its the ceiling I don’t think this will really matter much, as its not to noticable unless you feel it.  I was quite proud of the hole I cut in the tiles for the light, I used the tile saw to nibble out a some what circular hole, and once the cover gets put on it will look perfect.

Shower Curb

showercurb.JPG

The shower curb is constructed of three 2×4’s which is then covered with the shower liner, and then covered with a metal lathe.  On top of that I’ve put about 3/4″ of mortar.  Forming the curb was actually easier than I expected.  Using a pair of wood strips  on the top to keep it level and make a nice sharp corner, I was able to get a reasonably decent looking curb.  I found that I had added a bit to much water to the mortar, which meant that the sides of the curb kept slouching down.  However after waiting a bit for the mortar to firm up and dry out, I was able to get it to stay in position and got a nice flat top, with nice sharp corners.  I’ve also put a bit of a slope on the top so that any water that gets on it, flows into the shower, instead of out of it.  I did notice after the curb had dried that the right side was a bit thicker than the left, but its barely noticeable and shouldn’t cause any problems.

Shower Dam Corner

damcorner.JPG

Not really the best picture, but this is the corner on the top of the shower curb.   Since the shower membrane starts out as a flat sheet, it needs to be cut to go over the curb.  This means that the inside corner is unprotected on the top.  I ordered a pair of these PVC liner inside corners from the Noble company to stick over these areas.  They were a bit tricky to install, getting fully into the corner, but they should protect this corner from water leaking in.

Taping the seams

durockseams.JPG

Today I taped the seems in the Durock, using the special cement board fiberglass tape.  I say special because its apparntly not the same stuff that is used for installing sheetrock, which of course meant that I had to go buy a whole new roll of the stuff.  The cement board stuff is Alkali resistant to protect it from the cement based thinset.  The general process was acutaly pretty easy, although I did end getting more thinset on the floor, than on the joints when trying to do the upper corner, but I was smart enough to put some tar paper down before hand.   Therefore the only downside was the thinset getting on my feet.  This picture looks a little odd, because the thinset is half dried, so part of it is light gray, and part is dark gray.

Time to Rock!

durock.JPG

With the liner in place, it was time to do the Durock on the walls.  On the far wall I had added some shims made of 1/4″ plywood to bump out the studs so that Durock could lay flat over the drain pipe that I found stuck out beyond the studs.  After that I started cutting the Durock and hanging it up.  To cut the Durock I had originally bought a carbide scoring cutter, but after doing the piece for the ceiling I found that a jigsaw with an old blade on it, allowed me to cut circles easily, and I started using it for the straight lines as well.  While it dulled the heck out of the blade, even the dull blade cut through the board very easily, and made a nice clean, straight cut.  Unfortuanly after putting up two pieces I realized that I had forgotten the vapor barrier underneath, and therefore had to take them down, put up the tar paper, and then put the boards back up.  My wife gave me a hand putting up the Durock, as I couldn’t hold them, and screw them in place all by myself.

Testing the Shower Pan

liner.JPG

The most important part of the whole shower is the pan liner.  This is the part of the shower that is acutlay waterproof, and the last line of defense against the water.  Its crucial that the pan be isntalled correctly, without any holes in it.  The pan gets installed on top of a ‘deck mud’ pre-slope.  This means that the liner, when correctly installed will have a slight slope to it so that all of the water that collects in the pan, flows down into the weep holes in the drain.  Since the pan is so cruical, its important to test it by filling it with water leaving it overnight and making sure it doesn’t leak. 

Thats what I’m doing here, I’ve installed the liner over the pre-slope, folded and sealed the corners, and added extra reinforcement around the drain.  I’ve then stapled the upper edge of the ban to the 2×10 blocking I installed, and have filled it with water.   I’ve also drawn a line at the height of the water, so that I can tell if any has leaked out.  Hopefully tommorw morning the water will be at the same level, and teh ceiling below will be dry!

Getting ready for the Pre-Slope

floor2.JPG

The floor of a ceramic tile shower is an impressively complex system, with a slew of layers in it.  After putting in the plywood floor, the next step is a tar-paper backer, and then a metal lathe to add strength to the mortar that makes up the pre-slope.  I’ve also stacked three 2×4’s at the entrance to make up the shower dam, which will prevent water from flowing into the rest of the bathroom. 

Plumbing in the Shower Valve

showervalve.JPG

After putting in some lights to see by it was time to do the shower valve.  We’ve ordered some nice Moen Evahardware to use, and while we have to wait a few weeks for the handle and trim to show up, they had the valve in-stock so we could put that in.  Moen has some very fancy ‘Posi-temp’ setups, that allow you to always have the same temperature shower every day.  Of course these setups cost abotu $500, vs ~$150 for the regular single handle setup.  We figured that for that price we’d just get the regular valve, which also means that the installation is easier! 

 So after cutting out the old two handle shower valve, I cut up some pipe and soldered in the new valve.  At first I was getting the connections way to hot, and was having trouble getting the solder to wick into the joints, but after realizing my mistake, it went pretty quickly.  As you can see I did get some slight burns on the sheetrock, but nothing significant.   The valve can also be used with a tub setup, which means that in addition to the hot/cold pipes, and shower head, I also needed to put a stub and a cap on the bottom output.  Since I’m continually frustrated by the short showers I encounter,  I was very happy to be able to run the line almost to the ceiling so that I finally wouldn’t have to duck to get my head wet!