Ohh No, a Giant hole in the House!

hole1.jpg

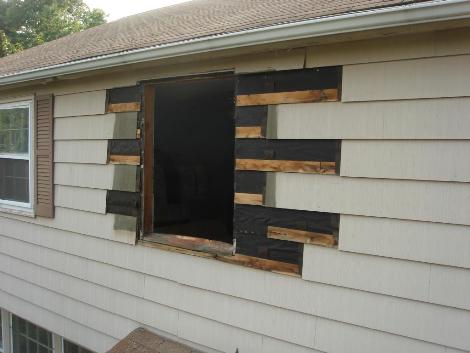
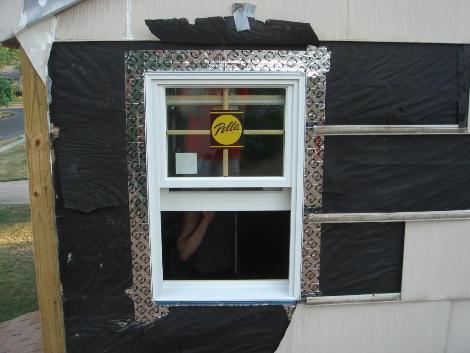
You might ask why in the middle of a bathroom remodel, I decided to replace the window in the front of the house.  How I got there is a bit of a long story.  You see it turns out, I’m cheap and didn’t want to waste three dollars worth of insulating foam.    Perhaps I should go to the beginning.  When we decided to redo the bathroom we wanted to replace the old window there.  Since it seemed silly to just order one window I decided to replace the front three windows as well.   Of course I planned on not actually installing the windows until I had finished the bathroom, but then halfway through installing the bathroom window I realized that insulating the window would only require half a can of Great Stuff foam.   Since you can’t really save the foam once you start using the can, I figured it would be a better idea to do another window and use the other half on that.   Seemed like a good idea at the time, but now I’m thinking it might have been a better idea to just concentrate on the bathroom and live with spending an extra couple bucks on the foam.

More Tiling!

tiling2.JPG

After going to Lowes and spending another 250 bucks, we put up another walls worth of tile last night.  At Lowes we picked out the shower floor tile, and the grout we are going to use.  Also picked up some insulation for the outside walls,  some blinds to go with our new windows, and a couple bits of plumbing stuff.  I’m hoping this will be our last big trip to Lowes for awhile, which is good because we used the very last of the 10% off coupons we had.

Since this was the second wall of tiling, we’re starting to get the hang of it, and it went up fairly easily.  We did have a problem trying to get the tiles to lineup with the other wall though.  Since this wall wasn’t straight, and since we didn’t want to cut the tiles here, it caused some of the gaps in the tile to be a bit bigger than we would have liked.  Hopefully it won’t be very noticeable once we’re all finished.  We had to stop about 6ft up the wall, as we’d like to put a row of trim tile there, and we don’t yet have that tile.

Tiling!

tile.JPG

Last night we put some more tile up, this time around the area where the vanity will go.   It’s a bit of a waste, as most of this area will be covered by the vanity, but this way if we ever decide to change to a pedestal sink or a smaller vanity it will all match.  It also let us get some practice in on an area where a mistake won’t be noticed.  The tiling went pretty easily, although it was fairly slow.  Due to the small area, and the pipes and such, a large number of tiles needed to be cut and that really slowed things down.  We got into a good rhythm though, with Jess measuring the tiles and me cutting them.  The tile saw I’ve got was a cheap little Felker, with a 4″ blade.  It works pretty well, although I think its going to need a new blade soon.  Tonight we’ll hopefully get a good chunk of the shower done.  We can’t do the top two feet or so, as we don’t have the trim tiles yet, but we’ll try and do the rest of it.

Sheetrock!

rock.JPG

Put in some nice clean sheets of Sheetrock today.    We are going to be tiling this area, however since its considered a “dry area” its ok to put the tile right onto Sheetrock, instead of having to put up Durock.   I used only one piece for each wall, which made getting the 8ft long piece into the room, and upright a bit tricky, but the lack of a horizontal seem should make life easier.  I also learned that its a much better idea to cut the rock a little short and then spackle the corners (which you have to do anyway) than it is to try and cut it exactly and end up with it being a tiny bit to big in one spot.   If its just a bit to big you either have to pull it out and cut it a bit bigger, or attempt to cut it in place.  If you try to force it (which of course I did) you end up breaking a big chunk off and ripping the paper.  Not a good result.   It should be hidden under the tile though so it won’t matter in the end.  I learned my lesson and the next piece went up easily and fit well. 

Sink Piping

piping.JPG

After much deliberation I went ahead and did the piping for the sink today.  The big problem was the drain piping.  The vanity we have has drawers on one side, which would have gotten in the way of the drain pipe where it was, so I had to move it to the left a few inches.  Using a torch I was able to twist the copper T so that it was pointed correctly.  My plan was then to put some copper in, put an elbow on it, and bring it out, nice and easy.   Probably would have worked quite well too, except for the problem that Lowes only had a 10ft piece of 1″1/4 copper pipe, and it was $80 bucks.  Through on top of that the 10$ elbow, and the 5$ threaded adapter, and I was looking at almost $100 just to move a pipe a few inches.  That seemed ridiculous so after a few days of thinking about it with my wife we came up with this solution.  I used a flexible rubber fitting to go from the copper T to a PVC elbow, and then put a nice piece of PVC sticking out.  Ended up only costing about $10, much more reasonable.  I’m not real thrilled with the flexible adapter, but the price is right, and since its on the drain and is easily accessible from the other side if something goes wrong, I figured I’d live with it.

Fans and Lights

fan-light.JPG

We added a ceiling light to the bathroom,  it was originally going to be a heat lamp, however we changed our mind and instead just made it a regular light after realizing that the lights over the medicine cabinet wouldn’t put out enough light.  We also put in a fan, to try and minimize the amount of moisture in the bathroom, and hopefully prevent the growth of mold and mildew.  We tried to get the quietest fan we could, however alot of the really quiet fans were quite large and I think would have looked silly in our small bathroom, so we ended up with this one which isn’t to loud, but certainly not ultra-silent.

Fan Timer

timer.JPG

Did some wiring today.  Got up as early as possible and crawled into the attic to install the fan and the recessed lighting over the bathroom.   For the fan, we’ve installed a timer switch so that you can just set it to 10 minutes or whatever after you finish your shower and it will shut itself off automatically.  It made the wiring a bit more complicated, but I think it will work out wonderfully later on.  I would have liked it to be near the door, however with two switches and an outlet already over there, there wasn’t enough room left for another one, so we put it next to the window instead.

Cabinets are here!

mirror-vanity.JPG

Today I picked up our fancy new bathroom fixtures.  Well I should rephrase that, I went and picked up the medicine cabinet/mirror and the toilet, and then had to have a friend with a SUV come and get the vanity since it wouldn’t fit in my car :-/  got them home and I’m real happy with how they look.  I do have two concerns though, the lights over the mirror are not really that bright, so we may need to add another light to the bathroom.  My other concern is that the drain from the sink may interfere with he drawers that are in the right side of the vanity.  Looks like I’m gonna have to run the drain line a bit to one side so that there is room for it.

New Window!

window1.JPG

The nice man from Pella dropped off our new windows yesterday.   The window that was in the bathroom was an aluminum sliding window, that was out of square, extremely dirty and horribly energy efficient.  With all the walls ripped out of the bathroom it seemed like a good time to replace the windows, and while I was at it I figured I’d replace all the windows on the front of the house as well.  We picked out some nice Pella Architect series windows, in the traditional style for our house.  I was quite happy to realize today that I would get a $200 tax credit for the windows due to their energy efficientness.

After three trips to Lowes I managed to get the first one installed today.   Once I had the shingles off it was actually fairly easy to install.   Unfortuantly getting the shingles off was a royal pain.  The shingles are put up in an  overlapping fashion, such that to get one out you pretty much have to take off the entire wall.  I managed to pry most of them out after some difficulty, however I did managed to crack two of them.   I have a few spares that I could use to replace them, however I’ll probably hold off on that until I paint the house.  Due to my expert measuring skills (well mostly luck I’m sure) the window fit perfectly, and since the opening was fairly square and level shimming it was easy as well.  The fancy Pella Smartflash tape that I used to tie in the window with the vapor barrier on the house also made life quite easy as it stuck to everything and was easy to tear.  I’m very happy without the windows look, and they’re also nice and quiet as well.

floor.JPG

I mixed up my deck mud, and protected my weep holes, now it was time to actually put down the floor.   I drew a couple guide lines on the walls, and adjusted the drain to the proper height so that I would get the specified 1/4″ per foot slope.  Then I dumped about half of the deck mud into the shower, and got to work, spreading it out and compacting it (using the top of a small sledge hammer) after I got the first half roughly down, I reinforced it with a piece of galvanized metal lathe, and dumped out the rest of the deck mud on top.  The second layer is much more work than the first, since the slope has to be close to perfect so that water actually goes down the drain, as this will be the layer that the tile goes on.  So after an hour or so of leveling, compacting, checking, and leveling I was finally happy with the end result.  I had my wife check and make sure that she couldn’t find any spots where the floor wasn’t sloped towards the drain, and after fixing the one spot she found, I was finished, with a very exhausted arm, after stamping down the mortar for an hour or two.  Happily after letting it dry overnight I was very happy with the result.