New Window!

window1.JPG

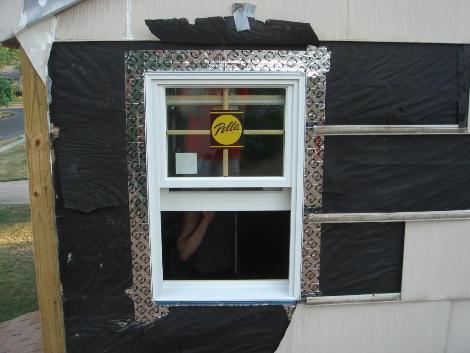
The nice man from Pella dropped off our new windows yesterday.   The window that was in the bathroom was an aluminum sliding window, that was out of square, extremely dirty and horribly energy efficient.  With all the walls ripped out of the bathroom it seemed like a good time to replace the windows, and while I was at it I figured I’d replace all the windows on the front of the house as well.  We picked out some nice Pella Architect series windows, in the traditional style for our house.  I was quite happy to realize today that I would get a $200 tax credit for the windows due to their energy efficientness.

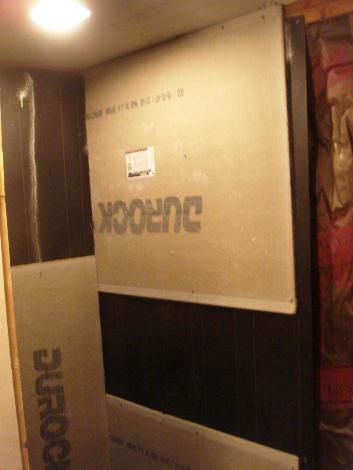
After three trips to Lowes I managed to get the first one installed today.   Once I had the shingles off it was actually fairly easy to install.   Unfortuantly getting the shingles off was a royal pain.  The shingles are put up in an  overlapping fashion, such that to get one out you pretty much have to take off the entire wall.  I managed to pry most of them out after some difficulty, however I did managed to crack two of them.   I have a few spares that I could use to replace them, however I’ll probably hold off on that until I paint the house.  Due to my expert measuring skills (well mostly luck I’m sure) the window fit perfectly, and since the opening was fairly square and level shimming it was easy as well.  The fancy Pella Smartflash tape that I used to tie in the window with the vapor barrier on the house also made life quite easy as it stuck to everything and was easy to tear.  I’m very happy without the windows look, and they’re also nice and quiet as well.

floor.JPG

I mixed up my deck mud, and protected my weep holes, now it was time to actually put down the floor.   I drew a couple guide lines on the walls, and adjusted the drain to the proper height so that I would get the specified 1/4″ per foot slope.  Then I dumped about half of the deck mud into the shower, and got to work, spreading it out and compacting it (using the top of a small sledge hammer) after I got the first half roughly down, I reinforced it with a piece of galvanized metal lathe, and dumped out the rest of the deck mud on top.  The second layer is much more work than the first, since the slope has to be close to perfect so that water actually goes down the drain, as this will be the layer that the tile goes on.  So after an hour or so of leveling, compacting, checking, and leveling I was finally happy with the end result.  I had my wife check and make sure that she couldn’t find any spots where the floor wasn’t sloped towards the drain, and after fixing the one spot she found, I was finished, with a very exhausted arm, after stamping down the mortar for an hour or two.  Happily after letting it dry overnight I was very happy with the result.

Weep Protector

weepprotector.JPG

The shower drain is a surprisingly complex device consisting of three separate pieces.  the first piece goes under the shower liner, and actually attaches to the drain.  The next is a ring that clamps the liner down on top of first pieces so that no water can get underneath the liner.  This second piece also has a few ‘weep’ holes in it, which are very important, and allow any water that gets to the liner, to actually drain away, and not just be trapped by the third piece.  The third piece is what you actually see, and is threaded into the second and is adjustable in height to match the depth of your base and tile.

The weep holes need to be protected from the mortar, else they would clog and become worthless.  Typically this is done with some pea gravel, or some broken tile or tile spacers.  However when I was ordering my liner cornersI noticed that Noble has a Positive Weep Protector.  Since I didn’t have any pea gravel, or spare tile spacers, and the sharp edges of broken tile scared me, I decided that since it was only a couple of bucks I’d try this out.  Its just a piece of clear plastic, that has ridges in it which would allow any water to flow underneath the mortar and get to the weep holes.  Seems like a good idea, but since I couldn’t find anyone who knew anything about it, I figured just to be on the safe side I’d toss a few tile spacers on top of it, as some added protection.

Deck Mud

deckmud1.JPG

Today I put down the second layer of deck mud (the first layer, the pre-slope,  goes under the liner) onto the shower floor.  This layer is constructed of a type of mortar that is called “dry-pack” mortar, or deck mud.  There seems to be alot of different opinions on just what this should consist of,  compounded by the fact that nobody seems to sell a pre-mixed deck mud product.  It also seems that there are alot of different things that will work, and they really just vary in how easy they are to get down.  If you use a mix that is too wet, you’ll have a hard time getting it to hold its shape.  If you use a mix that’s too strong, once it dries it will be impossible to knock out any lumps.  If you use a mix with to big an aggregate, you’ll end up with a lumpy floor, and if you use a mix with too much cement, it will shrink when it dries, and could crack. 

Therefore, the best mix is a ratio of 5 parts sand to 1 part cement, mixed to a fairly dry consistency similar to wet sand at the beach.  This won’t be a extremely strong product, but as its just going in the floor of your shower, it doesn’t need to be.  With the high amount of sand in it, it won’t shrink much as it dries, so you don’t have to worry about it cracking, and with just a dry mix its not too difficult to get the proper slope.  For more information, from a tiling expert, check out John Bridge’s page on Deck Mud.

First Tiles!

ceiling.JPG

We finally got to putting in some tile!  This is the first tile I’ve ever done, and doing the ceiling first was probaly not the best idea.  However it seemed to make the most sense, and so thats what we started with.  I’m quite happy with how it turned out, the grout lines look nice and even, and all the tiles are in line.  The only problem is that some of the tiles stick out a bit mroe than others do.  However since its the ceiling I don’t think this will really matter much, as its not to noticable unless you feel it.  I was quite proud of the hole I cut in the tiles for the light, I used the tile saw to nibble out a some what circular hole, and once the cover gets put on it will look perfect.

Shower Curb

showercurb.JPG

The shower curb is constructed of three 2×4’s which is then covered with the shower liner, and then covered with a metal lathe.  On top of that I’ve put about 3/4″ of mortar.  Forming the curb was actually easier than I expected.  Using a pair of wood strips  on the top to keep it level and make a nice sharp corner, I was able to get a reasonably decent looking curb.  I found that I had added a bit to much water to the mortar, which meant that the sides of the curb kept slouching down.  However after waiting a bit for the mortar to firm up and dry out, I was able to get it to stay in position and got a nice flat top, with nice sharp corners.  I’ve also put a bit of a slope on the top so that any water that gets on it, flows into the shower, instead of out of it.  I did notice after the curb had dried that the right side was a bit thicker than the left, but its barely noticeable and shouldn’t cause any problems.

Shower Dam Corner

damcorner.JPG

Not really the best picture, but this is the corner on the top of the shower curb.   Since the shower membrane starts out as a flat sheet, it needs to be cut to go over the curb.  This means that the inside corner is unprotected on the top.  I ordered a pair of these PVC liner inside corners from the Noble company to stick over these areas.  They were a bit tricky to install, getting fully into the corner, but they should protect this corner from water leaking in.

Taping the seams

durockseams.JPG

Today I taped the seems in the Durock, using the special cement board fiberglass tape.  I say special because its apparntly not the same stuff that is used for installing sheetrock, which of course meant that I had to go buy a whole new roll of the stuff.  The cement board stuff is Alkali resistant to protect it from the cement based thinset.  The general process was acutaly pretty easy, although I did end getting more thinset on the floor, than on the joints when trying to do the upper corner, but I was smart enough to put some tar paper down before hand.   Therefore the only downside was the thinset getting on my feet.  This picture looks a little odd, because the thinset is half dried, so part of it is light gray, and part is dark gray.

Time to Rock!

durock.JPG

With the liner in place, it was time to do the Durock on the walls.  On the far wall I had added some shims made of 1/4″ plywood to bump out the studs so that Durock could lay flat over the drain pipe that I found stuck out beyond the studs.  After that I started cutting the Durock and hanging it up.  To cut the Durock I had originally bought a carbide scoring cutter, but after doing the piece for the ceiling I found that a jigsaw with an old blade on it, allowed me to cut circles easily, and I started using it for the straight lines as well.  While it dulled the heck out of the blade, even the dull blade cut through the board very easily, and made a nice clean, straight cut.  Unfortuanly after putting up two pieces I realized that I had forgotten the vapor barrier underneath, and therefore had to take them down, put up the tar paper, and then put the boards back up.  My wife gave me a hand putting up the Durock, as I couldn’t hold them, and screw them in place all by myself.

Testing the Shower Pan

liner.JPG

The most important part of the whole shower is the pan liner.  This is the part of the shower that is acutlay waterproof, and the last line of defense against the water.  Its crucial that the pan be isntalled correctly, without any holes in it.  The pan gets installed on top of a ‘deck mud’ pre-slope.  This means that the liner, when correctly installed will have a slight slope to it so that all of the water that collects in the pan, flows down into the weep holes in the drain.  Since the pan is so cruical, its important to test it by filling it with water leaving it overnight and making sure it doesn’t leak. 

Thats what I’m doing here, I’ve installed the liner over the pre-slope, folded and sealed the corners, and added extra reinforcement around the drain.  I’ve then stapled the upper edge of the ban to the 2×10 blocking I installed, and have filled it with water.   I’ve also drawn a line at the height of the water, so that I can tell if any has leaked out.  Hopefully tommorw morning the water will be at the same level, and teh ceiling below will be dry!